Introduction
In iOS 13, context menus replace 3D Touch peek & pop. Though I’m sad to see 3D Touch go, the UIContextMenu API is a fantastic replacement. It works on all devices (including iPad!) and has powerful features for building menus and customizing your previews. This guide starts with a basic menu, then progresses to some of the more advanced features, such as submenus and various custom previews. It’s a little long, so ⌘+F might be your friend. Now let’s buckle up and get started!
If reading sample code is more your style, check out this repo. It contains an app that implements every section of this tutorial: https://github.com/kylebshr/context-menus
Adding a menu to any old view
There are two important parts to setting up a context menu on a view. The first is the interaction, which is all wrapped up in the UIContextMenuInteraction class. However, creating an interaction requires a delegate, which brings us to the second part of creating a menu: the UIContextMenuInteractionDelegate protocol.
To get started, let’s set up a view controller with a blue square in its view. Our goal is allow the user to long-press or 3D Touch that view to open the menu, which looks like this:
Our view controller class would look something like this:
class SingleViewController: UIViewController {
    private let menuView = UIView()

    override func viewDidLoad() {
        super.viewDidLoad()

        menuView.backgroundColor = .systemBlue
        menuView.frame.size = CGSize(width: 100, height: 100)
        view.addSubview(menuView)
    }

    override func viewDidLayoutSubviews() {
        super.viewDidLayoutSubviews()
        menuView.center = view.center
    }
}
I’m normally a huge proponent of Auto Layout, but sometimes frames are just easier 😜
Adding the interaction
Let’s add an interaction to the menu view so the system knows to show a menu when the view is pressed. This can be done in viewDidLoad right after we set up our view:
let interaction = UIContextMenuInteraction(delegate: self)
menuView.addInteraction(interaction)
This won’t compile quite yet, as our view controller doesn’t conform to UIContextMenuInteractionDelegate. Let’s go ahead and add an extension to our view controller for that protocol:
extension SingleViewController: UIContextMenuInteractionDelegate {
    func contextMenuInteraction(_ interaction: UIContextMenuInteraction, configurationForMenuAtLocation location: CGPoint) -> UIContextMenuConfiguration? {
        return nil
    }
}
This protocol has a single required method, contextMenuInteraction(_:configurationForMenuAtLocation:). This is where we create a UIContextMenuConfiguration with our menu options, and return it to the system so it can show it when the view is pressed.
Creating the menu
There are two important classes that we’ll use to build our menu configuration: UIMenu and UIAction. If you’re familiar with UIAlertController, UIAction plays a similar role to UIAlertAction - it’s configured with a title, some styling options, and a closure that gets called when the action is tapped. UIMenu is used to group actions together into a single menu.
Now that we know the pieces for building a menu, let’s take a look at how to build a UIContextMenuConfiguration. The initializer for it has three arguments, all of which are optional:
identifier: NSCopying: This is useful for passing data around to other contexts. We don’t need to use this now, but we’ll use it later on.previewProvider: UIContextMenuContentPreviewProvider: This type is just an alias for a function that takes zero arguments and returns a view controller. We’ll also revisit this later.actionProvider: UIContextMenuActionProvider: This type is also an alias for a function, and this is how we build a menu. The function receives an array of suggested actions, and returns aUIMenu.
For now, let’s ignore the suggested actions given to the actionProvider provider function, and build a menu with three options: share, rename and delete. We can use a trailing closure to do this right in the initializer of our configuration:
func contextMenuInteraction(_ interaction: UIContextMenuInteraction, configurationForMenuAtLocation location: CGPoint) -> UIContextMenuConfiguration? {
    return UIContextMenuConfiguration(identifier: nil, previewProvider: nil) { suggestedActions in

        // Create an action for sharing
        let share = UIAction(title: "Share", image: UIImage(systemName: "square.and.arrow.up")) { action in
            // Show system share sheet
        }

        // Create an action for renaming
        let rename = UIAction(title: "Rename", image: UIImage(systemName: "square.and.pencil")) { action in
            // Perform renaming
        }

        // Here we specify the "destructive" attribute to show that it’s destructive in nature
        let delete = UIAction(title: "Delete", image: UIImage(systemName: "trash"), attributes: .destructive) { action in
            // Perform delete
        }

        // Create and return a UIMenu with all of the actions as children
        return UIMenu(title: "", children: [share, rename, delete])
    }
}
Note: I’m using the new SF Symbols to easily add some nice icons for my actions.
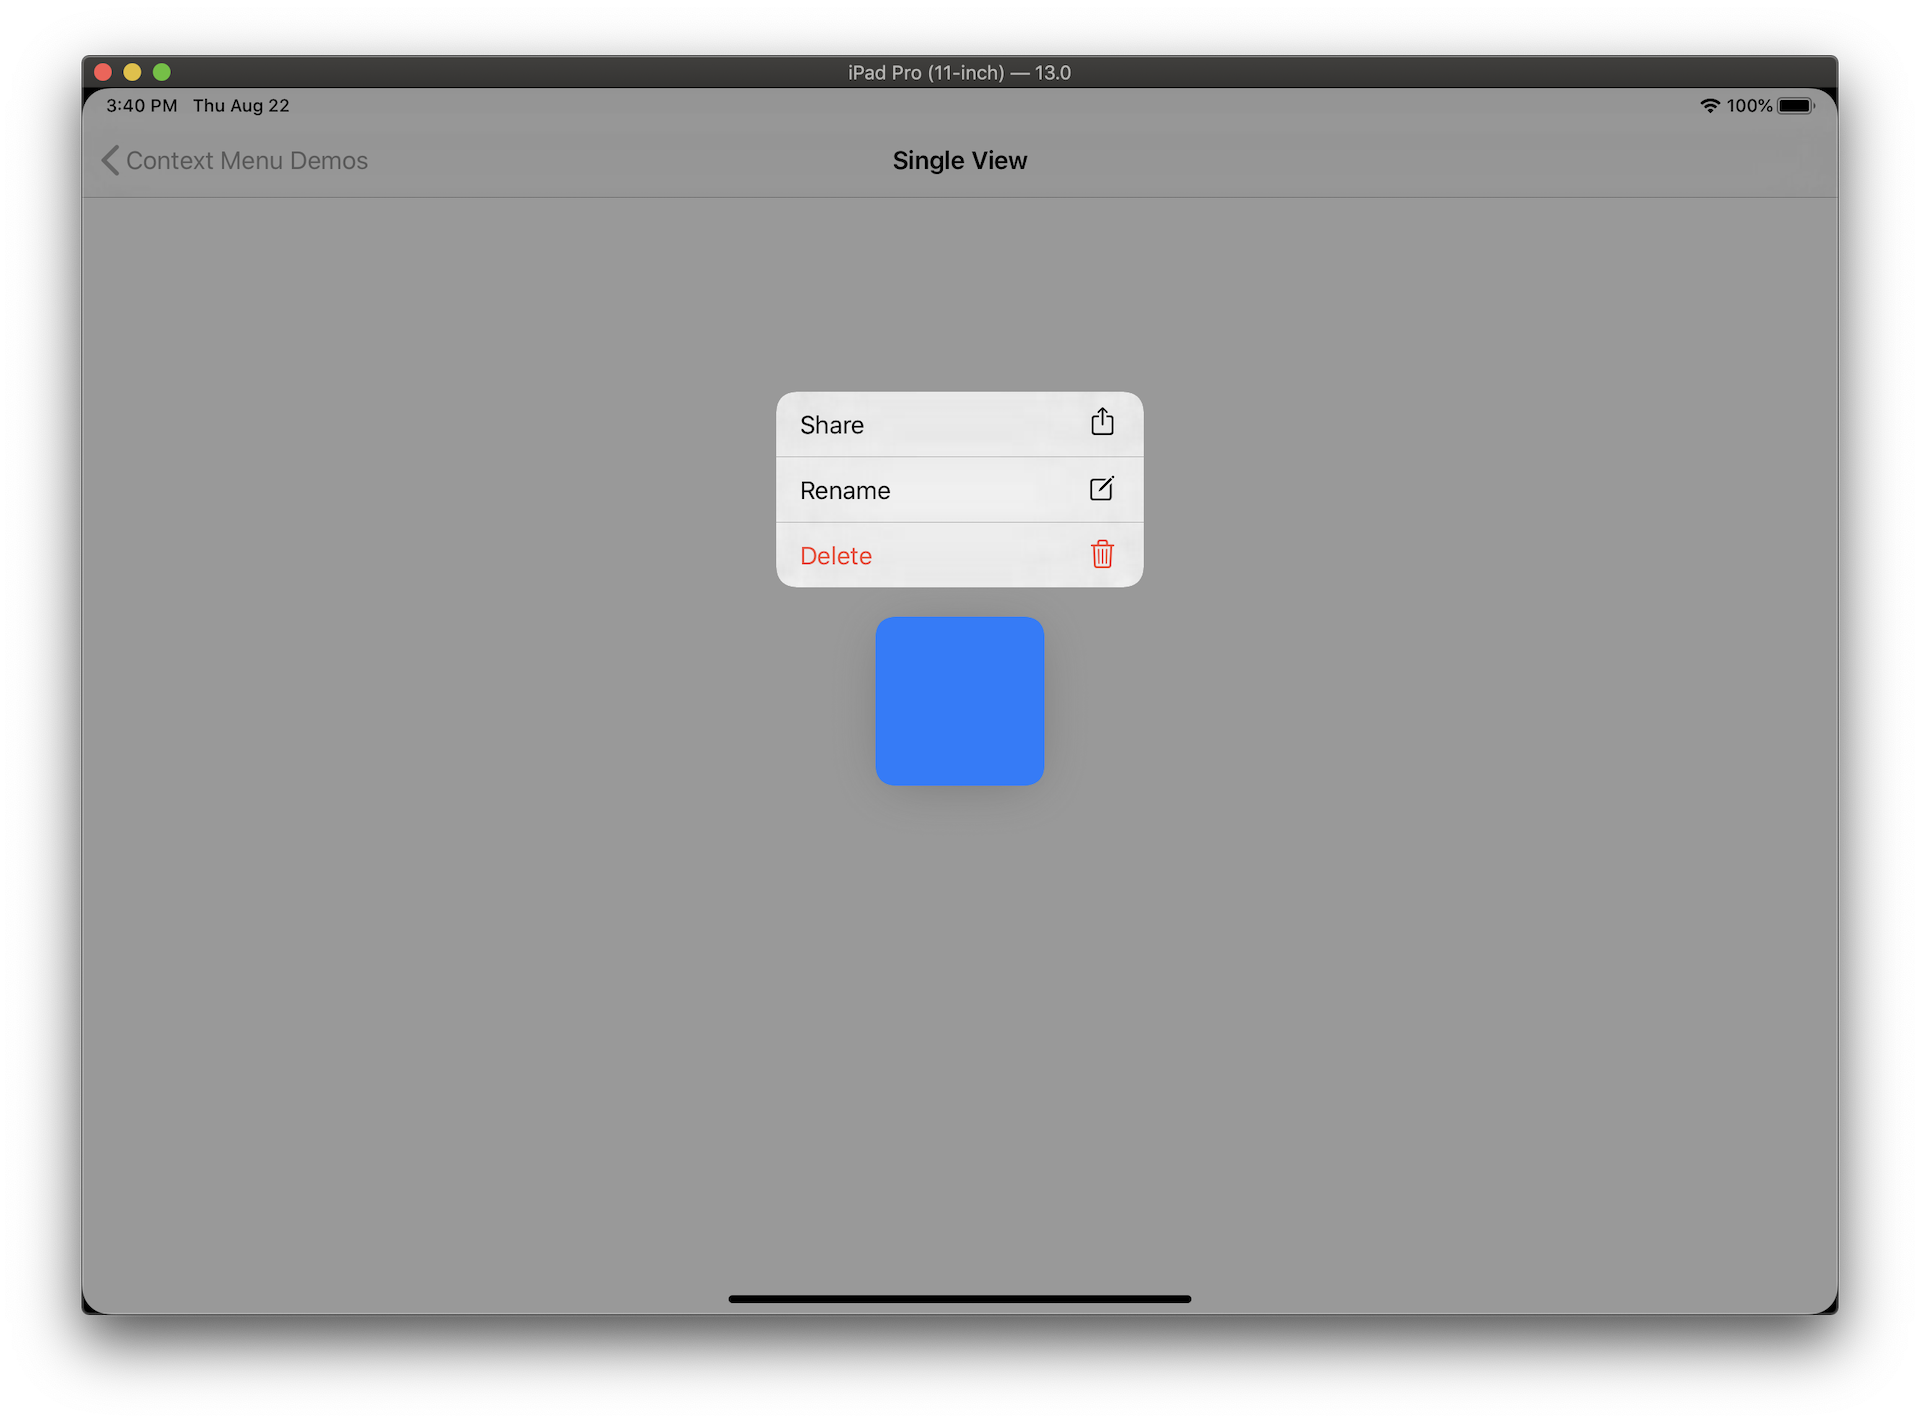
Now if you build and run the app, you should be able to long-press the blue view and see your menu! 👏 Since you’ve already seen it on iPhone, here’s what it would look like on an iPad:
Adding a menu to UITableView
Adding a menu to a single view is great, but often we want to allow a user to perform actions on an entire list of objects. Luckily, UIKit does a lot of the heavy lifting for adding menus to table view rows - in fact, we don’t even need to create or add an interaction to the table view or cells. Instead, every method in UIContextMenuInteractionDelegate has a corresponding UITableViewDelegate method. By implementing the table view delegate method tableView(_:contextMenuConfigurationForRowAt:point:), we can create a menu that’s shown when a cell is pressed:
In this case I’m using a UITableViewController and overriding the method, but if you’re using a table view with a separate delegate, just implement the same method there:
class TableViewController: UITableViewController {
    let data: [MyModel] = []

    override func viewDidLoad() {
        super.viewDidLoad()

        // Configure the table view
    }

    override func tableView(_ tableView: UITableView, contextMenuConfigurationForRowAt indexPath: IndexPath, point: CGPoint) -> UIContextMenuConfiguration? {
        let item = data[indexPath.row]

        return UIContextMenuConfiguration(identifier: nil, previewProvider: nil) { suggestedActions in

            // Create an action for sharing
            let share = UIAction(title: "Share", image: UIImage(systemName: "square.and.arrow.up")) { action in
                print("Sharing \(item)")
            }

            // Create other actions...

            return UIMenu(title: "", children: [share, rename, delete])
        }
    }
}
It’s important to note that I’m only using the index path outside of the action closure. You should use it to get a reference to your model right away, since the underlying table view data might change while the menu is displayed. That way, the action closure is called for the model that was pressed, not for whatever model is in that index once the action is tapped.
And that’s all it takes to add a menu to a table view! ✨
Adding a menu to a UICollectionView
If you’ve read along this whole way and think you might know how to do this already, you’re probably right! If not, check out the table view section above - just like UITableViewDelegate, UICollectionViewDelegate has methods for adding menus to your collection without any set up. Once we add a menu to a collection view, it’ll let us press each item to see a menu:
The code for this is almost identical for the table view example, but for posterity’s sake, here’s what it looks like. Again, be sure not to use the index path inside of an action:
class CollectionViewController: UICollectionViewController {
    override func viewDidLoad() {
        super.viewDidLoad()

        // Configure the collection view
    }

    override func collectionView(_ collectionView: UICollectionView, contextMenuConfigurationForItemAt indexPath: IndexPath, point: CGPoint) -> UIContextMenuConfiguration? {
        let item = data[indexPath.row]

        return UIContextMenuConfiguration(identifier: nil, previewProvider: nil) { suggestedActions in

            // Create an action for sharing
            let share = UIAction(title: "Share", image: UIImage(systemName: "square.and.arrow.up")) { action in
                print("Sharing \(item)")
            }

            // Create other actions...

            return UIMenu(title: "", children: [share, rename, delete])
        }
    }
}
Check out the CollectionViewController in the demo app to see how easy it is to create a collection view layout with iOS 13’s composable layout API.
Menus… inside of menus?
How to add a submenu
Submenus are great for grouping related actions, or for adding a confirmation and cancel option to a destructive option. We’re going to enhance our menu to do both of those. The best part about submenus is that they’re pretty easy to set up - all you have to do is create a normal UIMenu, and add it as a child of another menu! This is where the title and image options for the menu come in handy - the system will display the submenu as an action with the menus title and image, then show the submenu when that action is tapped.
In this snippet, we’ll make a Delete menu that has actions for Delete or Cancel. Then we’ll put our Rename action and Delete menu into an Edit… menu. Finally, we’ll put our Share action and Edit… menu into our main menu! Then we can return that main menu in our menuProvider.
let deleteCancel = UIAction(title: "Cancel", image: UIImage(systemName: "xmark")) { action in }
let deleteConfirmation = UIAction(title: "Delete", image: UIImage(systemName: "checkmark"), attributes: .destructive) { action in }

// The delete sub-menu is created like the top-level menu, but we also specify an image and options
let delete = UIMenu(title: "Delete", image: UIImage(systemName: "trash"), options: .destructive, children: [deleteCancel, deleteConfirmation])

let rename = UIAction(title: "Rename", image: UIImage(systemName: "square.and.pencil")) { action in }

// The edit menu adds delete as a child, just like an action
let edit = UIMenu(title: "Edit...", children: [rename, delete])

let share = UIAction(title: "Share", image: UIImage(systemName: "square.and.arrow.up")) { action in }

// Then we add edit as a child of the main menu
let mainMenu = UIMenu(title: "", children: [share, edit])
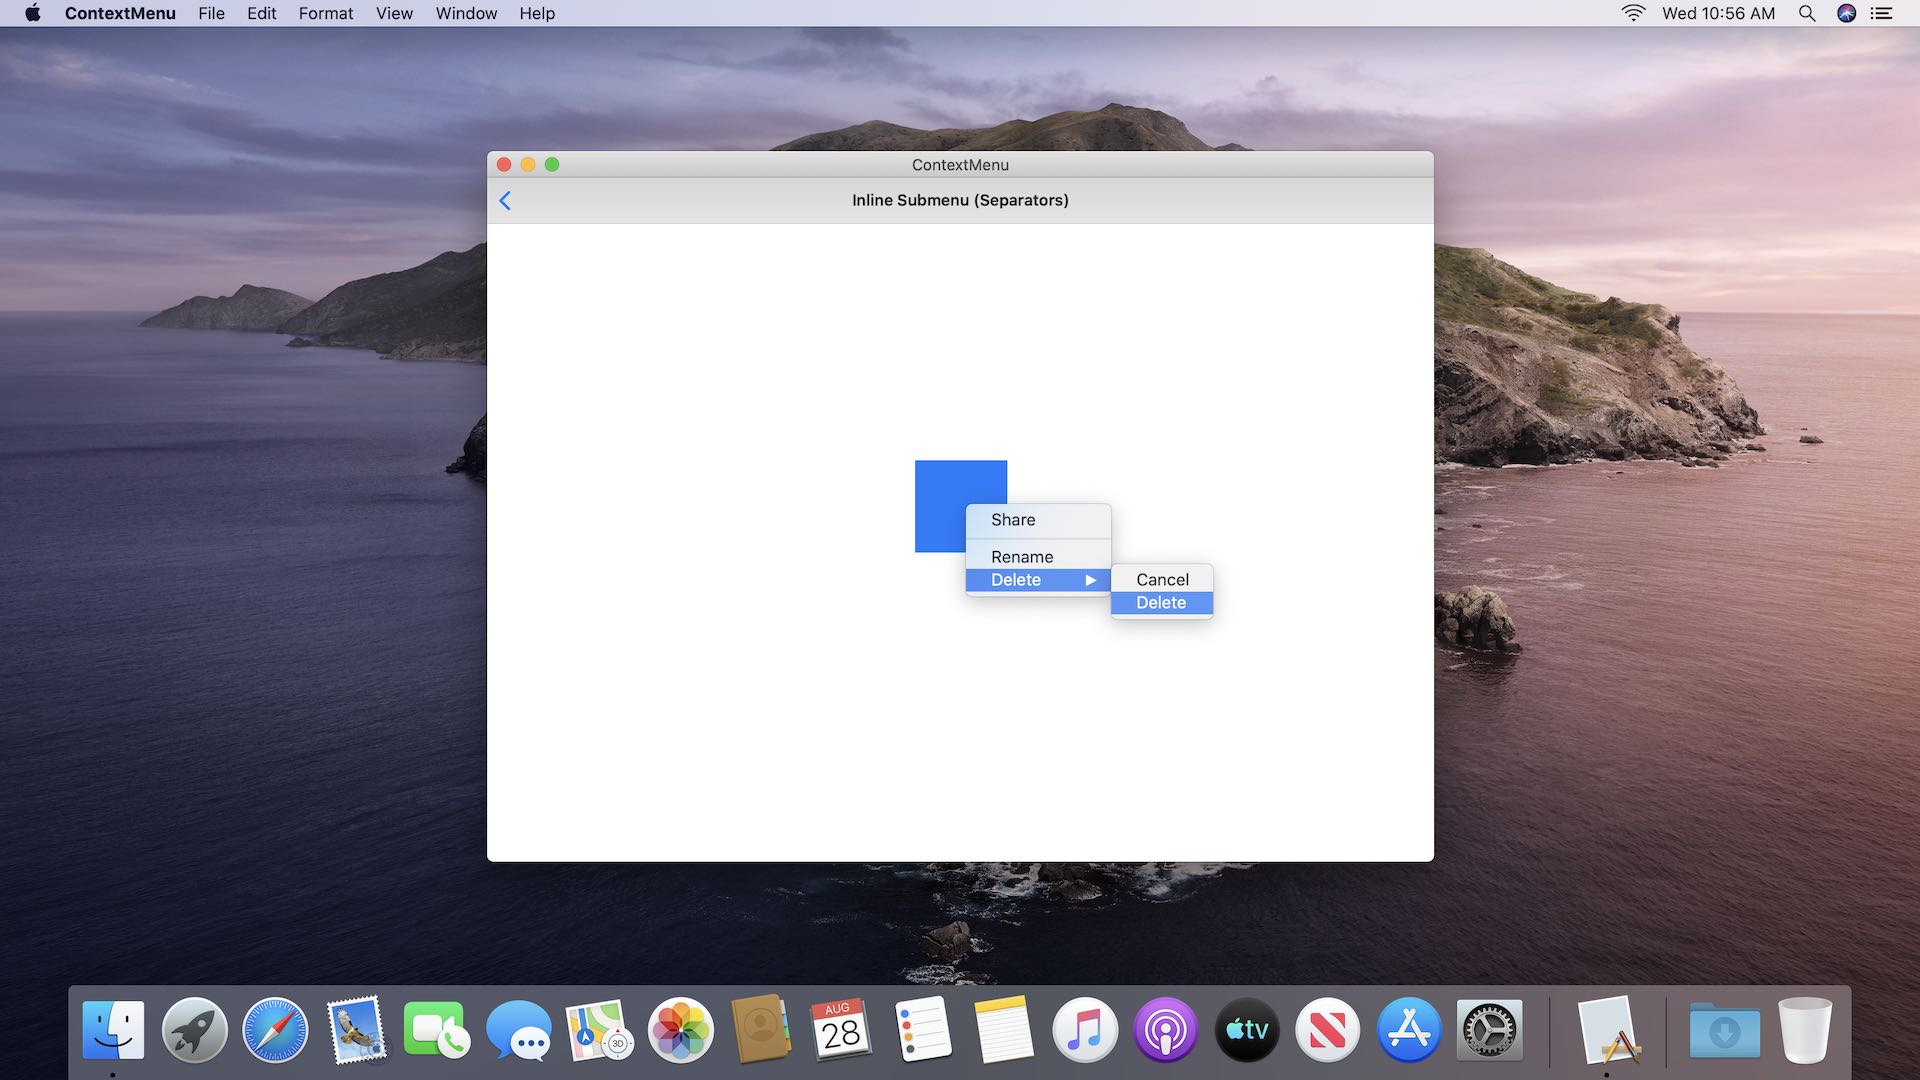
Inline submenus (or menu separators)
Sometimes it might make sense to have separators between different actions, but still show them at the top-level. In this case, we can use the displayInline option when creating a menu, which would look like this:
The only difference here is specifying the displayInline option when creating our edit submenu:
let edit = UIMenu(title: "Edit...", options: .displayInline, children: [rename, delete])
Custom previews 🌄
So far, we’ve relied on the default preview generated from our source view. But it’s often useful to create your own preview - in some cases, to allow the user to preview content (like peek did), or to polish up your user interface (those table view cell previews aren’t very eye-catching!)
View controller previews
One option for custom previews is to display a view controller as the preview. This is where the previewProvider of our configuration comes in handy - we can use the handler to return a preview view controller. It’ll have a default size, just like peeking did, but we can also specify a preferredContentSize to match the aspect ratio of an image. For example, a photo preview view controller might look something like this:
private class MountainsPreviewViewController: UIViewController {
    private let imageView = UIImageView()

    override func viewDidLoad() {
        super.viewDidLoad()

        let mountains = UIImage(named: "mountains")!

        imageView.image = mountains
        imageView.clipsToBounds = true
        imageView.contentMode = .scaleAspectFill
        imageView.translatesAutoresizingMaskIntoConstraints = false
        view.addSubview(imageView)

        NSLayoutConstraint.activate([
            imageView.leftAnchor.constraint(equalTo: view.leftAnchor),
            imageView.rightAnchor.constraint(equalTo: view.rightAnchor),
            imageView.topAnchor.constraint(equalTo: view.topAnchor),
            imageView.bottomAnchor.constraint(equalTo: view.bottomAnchor),
        ])

        // The preview will size to the preferredContentSize, which can be useful
        // for displaying a preview with the dimension of an image, for example.
        // Unlike peek and pop, it doesn't seem to automatically scale down for you.

        let width = view.bounds.width
        let height = mountains.size.height * (width / mountains.size.width)
        preferredContentSize = CGSize(width: width, height: height)
    }
}
Previews on a single view
To use this view controller as a preview, we’ll augment our SingleViewController to provide a previewProvider when it configures its menu:
func contextMenuInteraction(_ interaction: UIContextMenuInteraction, configurationForMenuAtLocation location: CGPoint) -> UIContextMenuConfiguration? {
    return UIContextMenuConfiguration(identifier: nil, previewProvider: MountainsPreviewViewController.init) { suggestedActions in
        return self.makeDefaultDemoMenu()
    }
}
A cool trick here is that the previewProvider just needs to be a function that returns a view controller. Since that’s exactly what the view controller’s initializer is, we can just pass a reference to that.
Now when we press our view (which I’ve tweaked to be a small image), we’ll see our mountain preview. One more great addition would be to push this view controller (or an alternative detail view controller) when the user taps on it. UIContextMenuInteractionDelegate provides a method contextMenuInteraction(_:willPerformPreviewActionForMenuWith:animator:), where can do just that. The trick here is to add a completion block to the animator that gets passed in, then we can safely push either the preview view controller (which is stored in the animator) or construct a new detail view controller and push that one. In this example, I just push the preview view controller:
func contextMenuInteraction(_ interaction: UIContextMenuInteraction, willPerformPreviewActionForMenuWith configuration: UIContextMenuConfiguration, animator: UIContextMenuInteractionCommitAnimating) {
    animator.addCompletion {
        if let viewController = animator.previewViewController {
            self.show(viewController, sender: self)
        }
    }
}
Here’s what our custom preview and commit look like:
Previews on a table or collection
This type of preview is perfect for photos, but more often you’ll display these in a collection view. Let’s take a look at how we can configure a preview with a specific image, and end up with a beautiful photo preview for a collection of photos, along with a different (somewhat plain 😅) detail view controller:
The main concept is the same as when we’re previewing a single view. However, this is where our menu’s identifier comes into play. Since we’re not pushing our previewed view controller, we need a way to construct a new detail view controller for the correct image. You may have noticed that the menu configuration is passed into willPerformPreviewActionForMenuWith - if we set an identifier for our image when setting up the configuration, we can use that to create our detail view:
override func collectionView(_ collectionView: UICollectionView, contextMenuConfigurationForItemAt indexPath: IndexPath, point: CGPoint) -> UIContextMenuConfiguration? {

    // We have to create an NSString since the identifier must conform to NSCopying
    let identifier = NSString(string: Fixtures.images[indexPath.row])

    // Create our configuration with an indentifier
    return UIContextMenuConfiguration(identifier: identifier, previewProvider: {
        return PhotoPreviewViewController(imageName: Fixtures.images[indexPath.row])
    }, actionProvider: { suggestedActions in
        return self.makeDefaultDemoMenu()
    })
}

override func collectionView(_ collectionView: UICollectionView, willPerformPreviewActionForMenuWith configuration: UIContextMenuConfiguration, animator: UIContextMenuInteractionCommitAnimating) {
    animator.addCompletion {

        // We should have our image name set as the identifier of the configuration
        if let identifier = configuration.identifier as? String {
            let viewController = PhotoDetailViewController(imageName: identifier)
            self.show(viewController, sender: self)
        }
    }
}
Table view menu configurations can be similarly set up to pass a model identifier around to the various menu functions.
Important: For the same reason we don’t use an index path in an action closure, you should never use an index path as an identifier. The underlying data of your collection or table could change before the user taps on the preview, so always pass a model or model identifier.
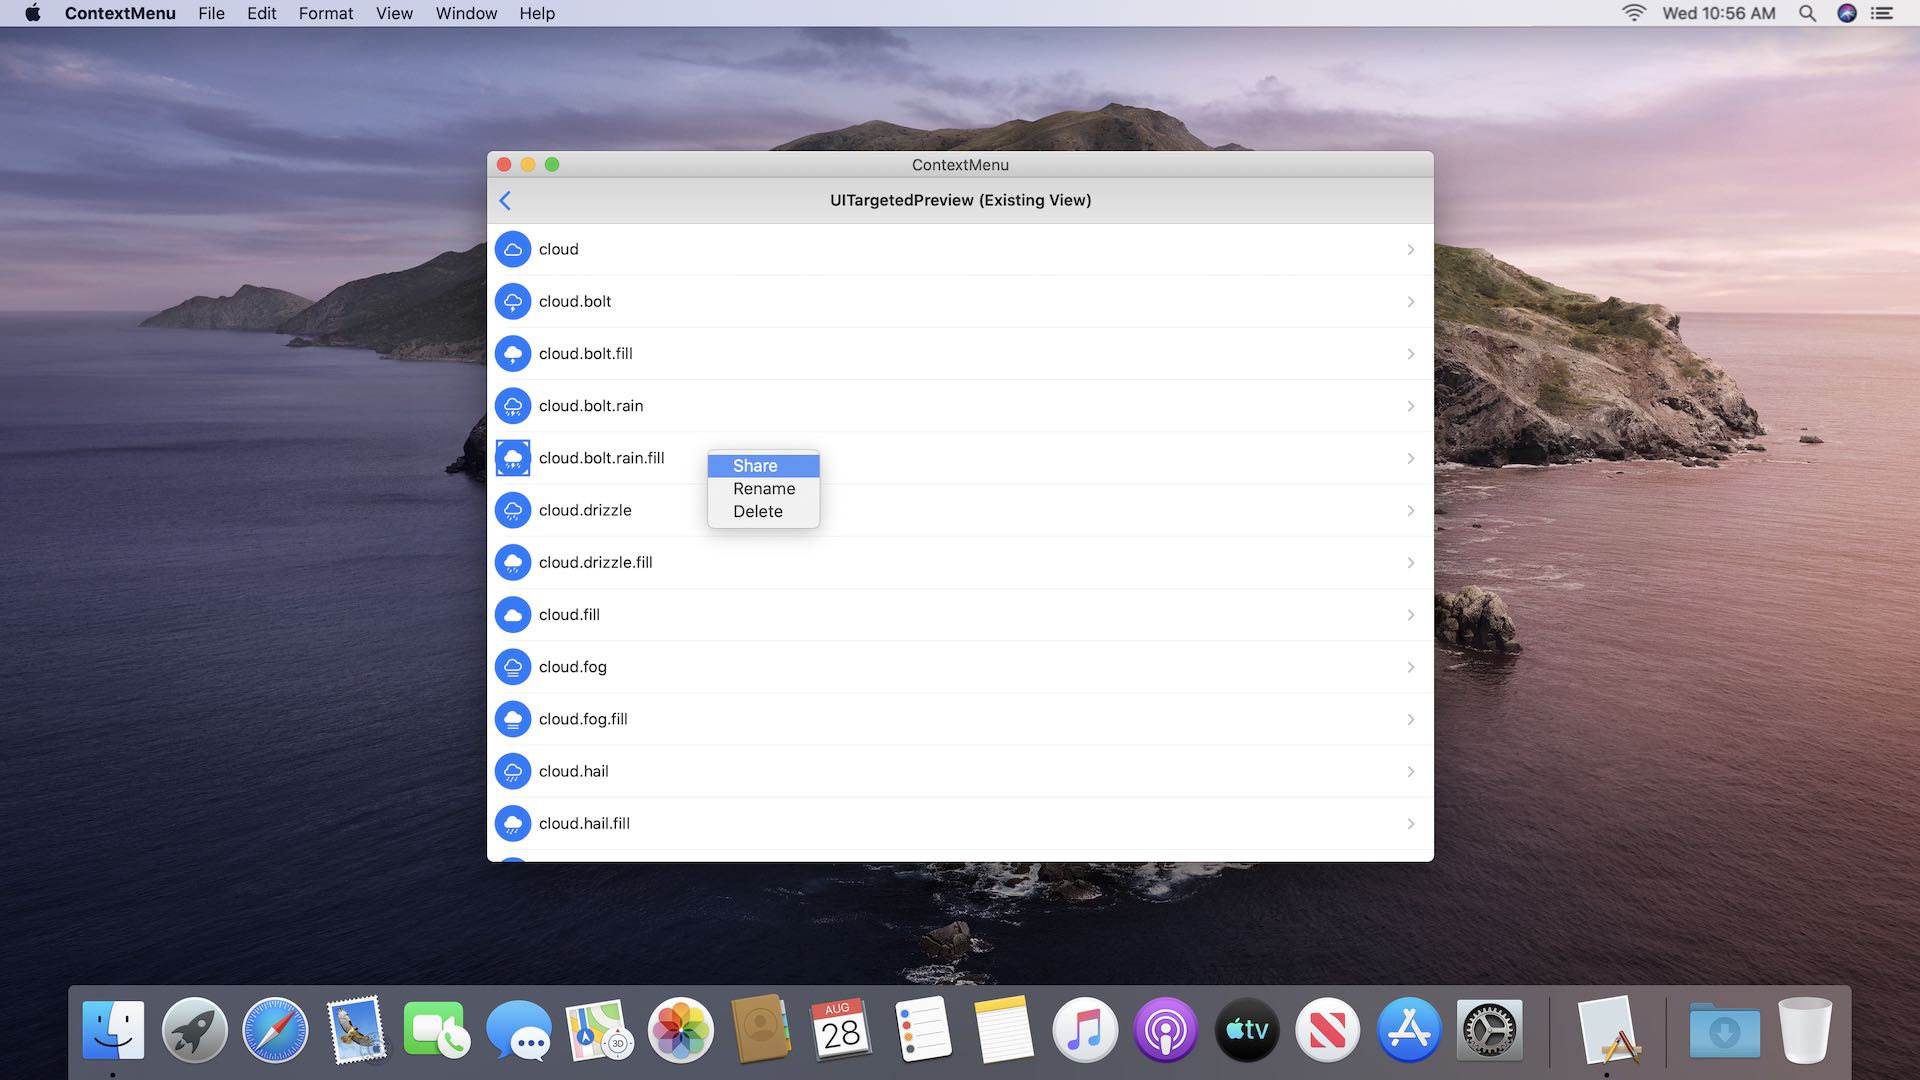
UITargetedPreview
There’s another way to create previews for your menu, and that’s with the contextMenuInteraction(_:previewForHighlightingMenuWithConfiguration:) delegate method. This method returns a UITargetedPreview, which describes the initial position and appearance of a preview. Our goal here is to make a table view preview much nicer by highlighting the leading icon instead of the whole cell:
Just like the other table or collection view configurations, we need to give our menu configuration an identifier. In this case, our table view is backed by an array of SF Symbol icon names - we’ll use that name as an indentifier:
override func tableView(_ tableView: UITableView, contextMenuConfigurationForRowAt indexPath: IndexPath, point: CGPoint) -> UIContextMenuConfiguration? {
    let identifier = NSString(string: Fixtures.cloudSymbols[indexPath.row])
    return UIContextMenuConfiguration(identifier: identifier, previewProvider: nil) { suggestedActions in
        return self.makeDefaultDemoMenu()
    }
}
Now for the preview, let’s implement previewForHighlightingContextMenuWithConfiguration. UITargetedPreview normally describes the initial position and appearance of a preview, but if we don’t have a previewProvider in our configuration, the system will use that preview when the menu is opened. We’ll need to first locate the icon view in the cell, so we’ll first use the identifier to locate the current index, and then the cell. Then we can create a UITargetedPreview using the image view from our cell, and the system will use that view as our menu preview! One last nuance is that our preview has a custom shape, so we’ll use UIPreviewParameters to remove the default white background from the preview.
override func tableView(_ tableView: UITableView, previewForHighlightingContextMenuWithConfiguration configuration: UIContextMenuConfiguration) -> UITargetedPreview? {

    // Ensure we can get the expected identifier
    guard let identifier = configuration.identifier as? String else { return nil }

    // Get the current index of the identifier
    guard let row = Fixtures.cloudSymbols.firstIndex(of: identifier) else { return nil }

    // Get the cell for the index of the model
    guard let cell = tableView.cellForRow(at: .init(row: row, section: 0)) as? IconPreviewCell else { return nil }

    // Since our preview has its own shape (a circle) we need to set the preview parameters
    // backgroundColor to clear, or we'll see a white rect behind it.
    let parameters = UIPreviewParameters()
    parameters.backgroundColor = .clear

    // Return a targeted preview using our cell previewView and parameters
    return UITargetedPreview(view: cell.previewView, parameters: parameters)
}
Note that IconPreviewCell is a custom cell subclass, and the previewView property is the view displaying the icon in the blue circle.
When implementing previewForHighlightingContextMenuWithConfiguration, we also need to implement the complementing contextMenuInteraction(_:previewForDismissingMenuWithConfiguration:). This tells the system how to animate the dismissal of the preview, by giving it a targeted preview for the final position and appearance of the preview. In this example, we want to create and configure the preview exactly the same way, so let’s refactor our code into a helper function for creating the preview and call it from both methods:
private func makeTargetedPreview(for configuration: UIContextMenuConfiguration) -> UITargetedPreview? {

    guard let identifier = configuration.identifier as? String else { return nil }
    guard let row = Fixtures.cloudSymbols.firstIndex(of: identifier) else { return nil }
    guard let cell = tableView.cellForRow(at: .init(row: row, section: 0)) as? IconPreviewCell else { return nil }

    let parameters = UIPreviewParameters()
    parameters.backgroundColor = .clear

    return UITargetedPreview(view: cell.previewView, parameters: parameters)
}

override func tableView(_ tableView: UITableView, previewForHighlightingContextMenuWithConfiguration configuration: UIContextMenuConfiguration) -> UITargetedPreview? {
    return makeTargetedPreview(for: configuration)
}

override func tableView(_ tableView: UITableView, previewForDismissingContextMenuWithConfiguration configuration: UIContextMenuConfiguration) -> UITargetedPreview? {
    return makeTargetedPreview(for: configuration)
}
Finally, by implementing willPerformPreviewActionForMenuWith like we did in our collection view, we can show a detail view when the preview is tapped (just like the video above).
UITargetedPreview ❤ previewProvider
Let’s say that we wanted to use a previewProvider to display a different view than what we see in the cell. It would be really nice if we could animate from the image view, instead of from the whole cell (the default behavior). It turns out you can use UITargetedPreview to do just that:
In order to accomplish this, we’ll specify a previewProvider when creating our menu configuration. PreviewViewController displays the SF Symbol and name like you see above, and sets a preferredContentSize so it hugs the icon and label.
override func tableView(_ tableView: UITableView, contextMenuConfigurationForRowAt indexPath: IndexPath, point: CGPoint) -> UIContextMenuConfiguration? {

    let symbolName = Fixtures.cloudSymbols[indexPath.row]
    let identifier = NSString(string: symbolName)

    return UIContextMenuConfiguration(identifier: identifier, previewProvider: {
        return PreviewViewViewController(systemImageName: symbolName)
    }, actionProvider: { suggestedActions in
        return self.makeDefaultDemoMenu()
    })
}
Once again, our target preview is the same for highlighting and dismissing, so let’s implement that in a helper method. In this example, I’m using the cell’s built-in image view, so let’s specify a custom path for the preview to round the corners of the image view when it’s highlighted:
private func makeTargetedPreview(for configuration: UIContextMenuConfiguration) -> UITargetedPreview? {

    // Ensure we can get the expected identifier
    guard let identifier = configuration.identifier as? String else { return nil }

    // Get the current index of the model
    guard let row = Fixtures.cloudSymbols.firstIndex(of: identifier) else { return nil }

    // Get the image view in order to create a transform from its frame for our animation
    guard let cellImageView = tableView.cellForRow(at: .init(row: row, section: 0))?.imageView else { return nil }

    // Create a custom shape for our highlight/dismissal preview
    let visiblePath = UIBezierPath(roundedRect: cellImageView.bounds, cornerRadius: 3)

    // Configure our parameters
    let parameters = UIPreviewParameters()
    parameters.visiblePath = visiblePath

    // Return the custom targeted preview
    return UITargetedPreview(view: cellImageView, parameters: parameters)
}

override func tableView(_ tableView: UITableView, previewForHighlightingContextMenuWithConfiguration configuration: UIContextMenuConfiguration) -> UITargetedPreview? {
    return self.makeTargetedPreview(for: configuration)
}

override func tableView(_ tableView: UITableView, previewForDismissingContextMenuWithConfiguration configuration: UIContextMenuConfiguration) -> UITargetedPreview? {
    return self.makeTargetedPreview(for: configuration)
}
Not too bad! Now we have a great animation for our preview from the original image.
What about macOS?
With Catalyst, it’s easier than ever to bring a UIKit-based app to macOS. But what happens to our context menus there? The great thing is that they work on macOS pretty well right out of the box. If you’re on Catalina and check the box for macOS, our demo app should work great, and right-clicking a view with a menu brings it up - including inline and nested menus:
One thing to note is that there’s no previewing or action images on macOS, and right-clicking only shows the menu with the text for each action. The system does highlight the view in our targeted preview example though, which won’t always look great. You might want to consider only creating targeted previews on iOS and iPadOS.
 The blue rectangle around our cloud icon isn’t the most appealing UI I’ve seen
Conclusion
Well, that was a lot of content! 😅 To check out a demo app with all of these examples, head to https://github.com/kylebshr/context-menus. If you found this useful, please share on twitter, and follow me for updates on future blog posts at @kylebshr!