Update October 25, 2020
With some of the new iPads, iPhone 12, 12 mini and 12 Pro Max all having different corner radii, I finally poked around to find a private API that reports the value iOS is using. This is all wrapped up nicely in my ScreenCorners Swift Package/cocoapod - just add the dependency and use UIScreen.main.displayCornerRadius.
(Warning: this package does use the private API. Justification in the readme, and I don’t think it’ll flag App Review, but use at your own risk!)
Here’s the values reported by iOS - turns out that as far back as the iPhone Xr, we had multiple values!
| Device | Value (pts) |
|---|---|
| iPhone X / Xs / Xs Max / 11 Pro / 11 Pro Max | 39.0 |
| iPhone Xr / 11 | 41.5 |
| iPhone 12 mini | 44.0 |
| iPhone 12 / 12 Pro | 47.33 |
| iPhone 12 Pro Max | 53.33 |
| iPad Air / iPad Pro 11-inch / 12.9-inch | 18.0 |
And now, the original blog post!
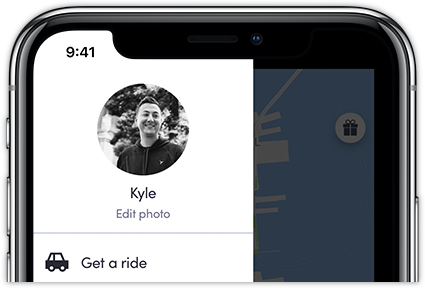
Something that has bothered me about the Lyft app since switching to an iPhone X is that the receding view behind the side menu has square corners:
This looks a little strange because it doesn’t match the shape of the screen; why is there even UI there? In fact, Apple often masks views to fit into the corner on iPhone X, such as in the app switcher and Safari tab UI. Notice how the corner radius animates to match the display, rather than extending outside the edges:
Since one of Lyft’s core values is Make it Happen, I set out to do the same in the Lyft app 🤠 I figured this would be pretty easy with a rounded rect CGPath, so I did some quick research on the corner radius of the iPhone X display. Unfortunately there was no definitive answer — PaintCode claims the display has a radius of 40 pt, while Max Rudberg says “…the number 44 pt is found once again in the screen’s corner radius” in this blog post about iPhone X UI design.
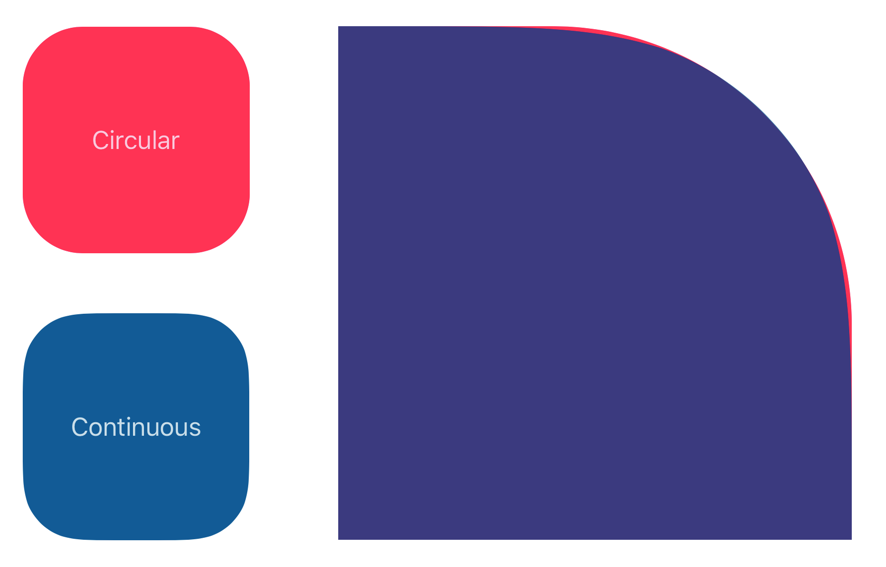
I decided the only option was to build an app that let me customize the corner radius, run it on my iPhone X, and settle this with my own experimentation. But there was one more missing piece: the iPhone X doesn’t have a perfectly circular path like you’ll find in most rounded rects (including CGPath). Instead, it has a continuous corner, or “squircle”, just like the app mask on the iOS homescreen. (You can read more about the iPhone X display shape in this excellent piece by Brad Ellis.) That is, instead of a quarter-circle that abruply meets the flat edge of the rect, there’s a more gradual slope where the rect meets the circle. This is more visually pleasing, but also harder to replicate — and CGPath uses circular corners, not continuous ones.
After more googling, I stumbled up this tweet thread — it turns out that UIBezierPath uses continuous corners for its rounded rect implementation! Now I had all the pieces to build an app and start experimenting.
The first thing I did was build a view that compared CGPath’s rounded rect to UIBezierPath’s — I wanted to confirm that I could get a continous corner. Sure enough, you can see a side-by-side difference between the two, which was even more obvious when I overlaid them:
Next, I built a view that lets you adjust the corner radius with a slider. By setting the window color to red, I could easily see if the view was fitting into the corner or if the radius was too large.
At first, it felt like 40 pt was correct — I could maybe just barely see the red peeking through on the top corners, but on the bottom I couldn’t see anything. I think it’s safe to guess that the display is being cut at whatever 40 pt on the iPhone X display translates to physically. Then I realized that I should probably try to match the value Apple is using programmatically, so I popped open the app switcher and surprise! 40 pt was letting a noticable amount of red bleed through, which meant it was bigger than the radius Apple uses. After some experimentation, I settled on 38.5 pt as the smallest I could get to just barely hide the red window. This seems like a safety factor to make sure there’s no bleeding, as I’m sure there’s some variation in physical displays due to manufacturing.
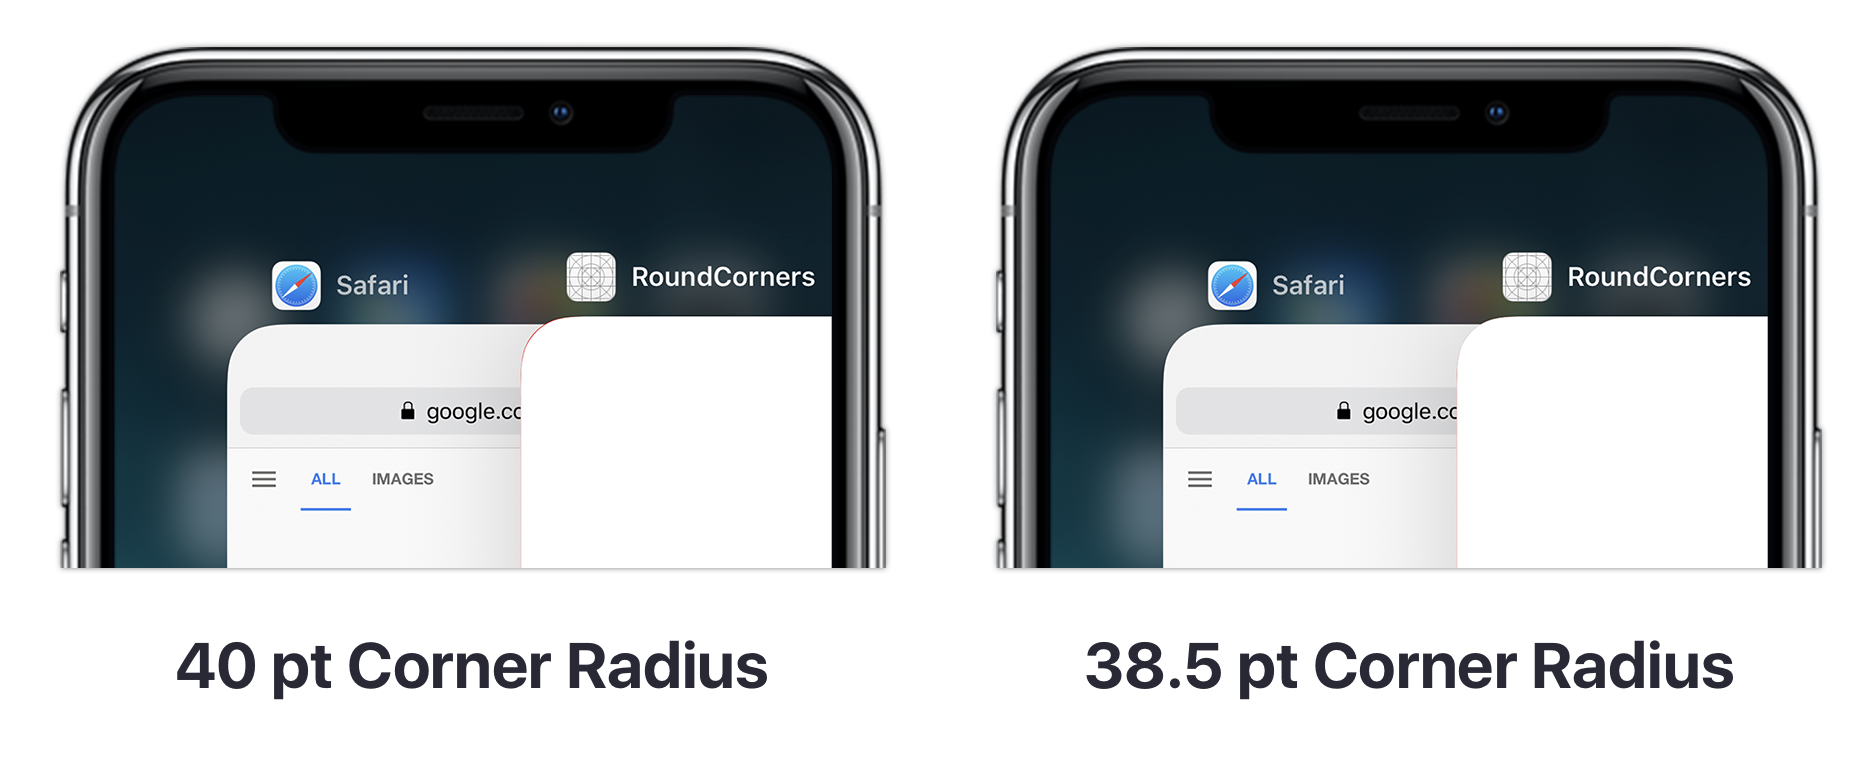
So there you go — if you want to round your corners to match iOS, you should use a 38.5 pt radius rounded rect created using UIBezierPath. Here’s a link to the app I built to experiment with, and below is a code snippet for masking a full-screen UIView with continuous, iPhone X-sized corners. Now go forth and build iPhone X shaped UI!
let maskLayer = CAShapeLayer()
maskLayer.path = UIBezierPath(roundedRect: view.bounds, byRoundingCorners: .allCorners, cornerRadii: 38.5).cgPath
view.layer.mask = maskLayer
And, of course, the happy ending for the Lyft app:
